I have a love-hate relationship with this card. There. I said it.
The Love:
I love sunflowers, teal, and shiny gold details. And this card has all three. So what's not to love? Let's get into the card making, and maybe I'll learn to love it before this story is over.
The Challenge:
This card is part of the Sharing Summer hop over on Instagram. The theme for week #3 is Bring on the Heat Embossing, and as long as that theme inspires your card making, you've met the challenge.
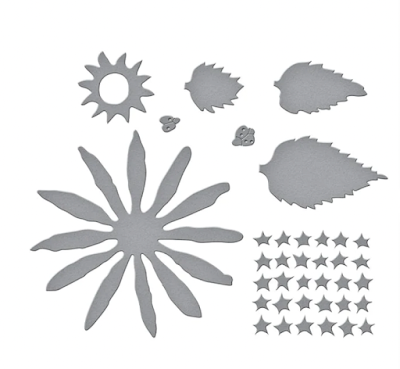
I used the Sunflower and Ladybugs Etched Dies from Spellbinders. If there's anything that says summer heat, it's sunflowers, so these seemed perfect for the heat theme. And I used gold embossing powder.
Challenge ✅
The Card Base & Sentiment:
For the card front, I cut a piece of Gina K Turquoise Sea card stock, cut to 4.25 x 7". I masked off the bottom 3/4" for the sentiment and then ink blended Gina K Blue Lagoon and Tranquil Teal inks around the edges of the panel. I removed the mask, and for the sentiment, I stamped the Happy Birthday stamp -- from the Ink Blot Shop's Solid Sayings set -- in Versamark ink and heat embossed using (retired?) Nuvo Classic Gold powder.
Note: If you don't have a stamp set like this, I highly recommend it! It is perfect for when your sentiment space can't accommodate letter ascenders or descenders. (Those are the tall sticks and hanging down tails of letters. Everything is Googlable.)
The Pattern:
To create pattern on the background, I dry embossed using the Sizzix Geometric Flowers 3D embossing folder.
Then, I heat set.
Be sure to heat set.
I cannot say this enough.
Then, after you heat set, be sure to test by pouring embossing powder onto the background. If any sticks, you need to brush it off and heat set some more.
Even when the background is dry, be sure to use an anti-static powder tool before the next step!
Use a brayer to apply Versamark ink gently over the pattern. This will add ink only to the raised areas. Then, pour on embossing powder, tap off the excess, and heat set again.
I have used this technique before, and I got clean, flawless results. This time I did not. You wanna guess why?
I didn't heat set enough.
But it's fine.
The Flowers:
This was my first time using a set of these Spellbinders flower-building dies, so I didn't know what to expect. These are the ones by Susan Tierney-Cockburn, and let me tell you, if you want to get schooled on gardening, watch one of this lady's video tutorials. She knows as much about nature as she does about paper. Her videos not only show you how to build the flowers, she also tells about the flowers' history and life cycle and growing habits. It's like botany class, only without Mr. Weinrich's awful dad jokes.
But I digress...
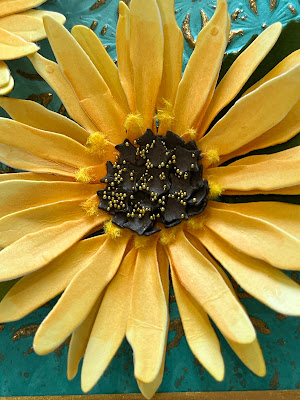
I die cut the flower petals and flower center out of white card stock. One cool thing about these dies is that each die has a number stamped on it that tells you how many you'll need to cut to make a flower! For these sunflowers, you need three petal pieces and one flower center. I colored these pieces, front and back, with shades of yellow and orange Copic markers.
I followed the Spellbinders video tutorial to shape the petals and flower center, so I won't go into how that works. Let's just say, it's challenging if you don't have the right tools, which I do not.
This could be where my relationship with this card turned south.
In the video, Susan actually adds pollen to the tips of the flower center. Yeah, you read that right. Pollen. I clearly do not keep a bowl of pollen in my craft stash. I tried gold embossing powder, not heat set, just dusted on. That. Looked. Stupid.
Then, I remembered, I had some yellow flocking powder, unused from so long ago I can't even remember why I bought it. I dipped the points of the flower center into liquid glue and then dipped it into the yellow flocking powder. It would do.
Who even knows what real pollen looks like anyway?
Next, it was time for the seeds. I die cut these from a scrap of brown card stock. You, perhaps, can't fully appreciate this unless you see how tiny these are in real life, but each flower gets sixty of these little seeds. You use a small stylus to shape each one of these and then glue all sixty of these into the center of the flower.
Sixty.
I maybe used 30-40 of them before I got tired of it. And, even with my tiniest stylus, I don't think my seeds got cupped enough to actually look like seeds.
Finishing Up:
So, what's my problem?
Tammy


Comments
Post a Comment